Installing Your iMosaicArt Masterpiece
Turn any space into a stunning work of art. This beginner-friendly guide walks you through every step — from prep to polish — for a flawless, professional finish.
No prior experience needed — your walls and floors are the canvas, and every tile a brushstroke.
What You'll Need
We provide the mosaic artistry — you'll just need a few trusty tools, all available at your local hardware store or online.
Six Steps to a Flawless Finish
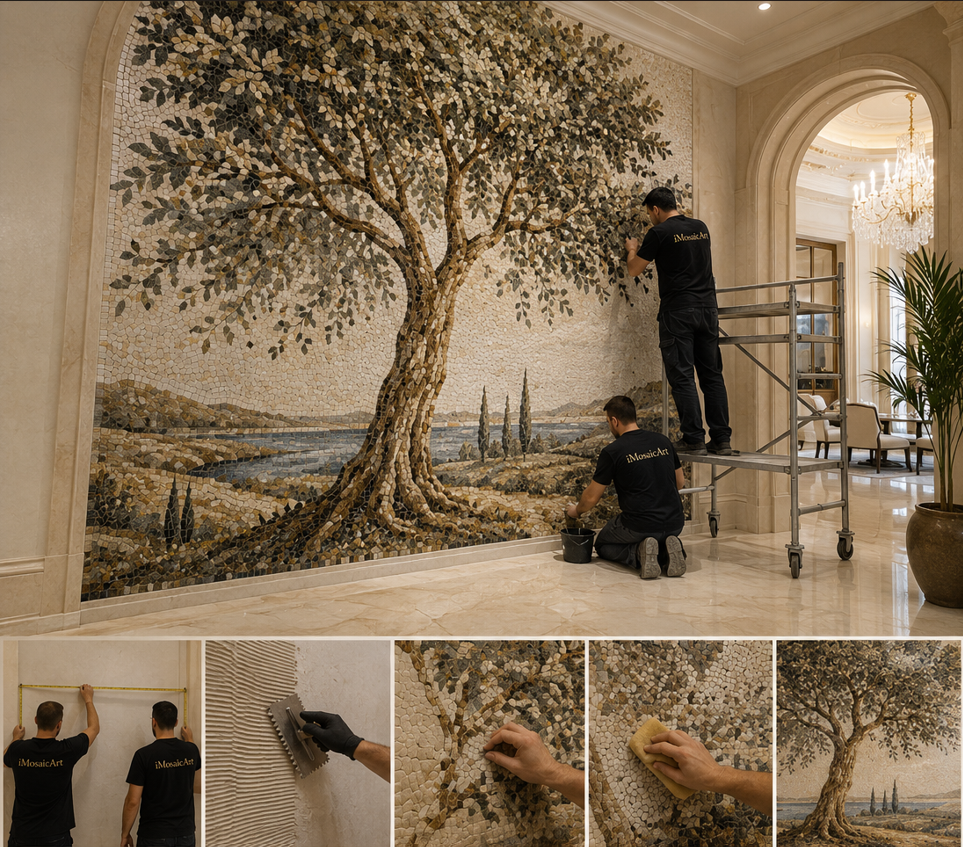
Prepare Your Surface
Give your chosen surface a thorough cleaning with a damp sponge and soapy water. Remove any dust, dirt or grime to ensure the adhesive bonds optimally.
For uneven surfaces, apply a leveling compound first to create a smooth, even base.
Prepare Your Mosaic for Application
Once your surface is prepared, turn to the mosaic: it arrives rolled like a rug — large designs come as numbered sections you assemble like a puzzle; simply unroll it flat (design side down), peel off the backing plastic sheet and any leftover glue, then flip it over and clean the tile surface before installing. If any tiles are missing, use the spare extra tiles we always include in the package — trim the long spare tiles to size and add them as you install.
Spread the Adhesive
Using your trowel, spread a thin, even layer of adhesive onto the prepared surface. Follow the manufacturer’s instructions for drying time before moving on.

Embrace the Mosaic Magic
Now the fun part. Starting from the center or a corner, gently press your mosaic into the adhesive, keeping proper alignment and spacing. Check with your level regularly to maintain a flawless finish.
Let the Art Settle
Once your mosaic is in place, allow the adhesive to cure completely according to the manufacturer’s recommendations — this typically takes 24 to 48 hours.
Grout Your Masterpiece
Mix your grout per the package instructions and apply it with the grout float, working diagonally across the mosaic, then wipe away any excess with a damp sponge. Once it dries, seal the grout to protect it from moisture — unless you used epoxy grout, which is already non-porous and needs no sealing.

Grout is optional for indoor, dry installations — but essential for exterior, pool and wet areas, where it seals the joints and protects the mosaic from moisture. Choose a light grout for light-toned designs and a dark grout for darker ones, so the joints blend naturally.
Reveal Your Creation
After the grout dries completely (usually 24 to 72 hours), buff the surface with a soft cloth to bring out its shine and reveal your stunning finished masterpiece.
Plan for Patience, Not Effort
Hands-on work is just a few hours — most of the timeline is letting adhesive and grout cure.
A Masterpiece, Admired for Years
You've transformed your space into a unique work of art. Ready for your next? Explore new patterns, bold colors and endless possibilities.